How to Crochet Fingers and Hands
Some of my recent patterns are now including fingers and hands and I would like to show you how I do this with a photo tutorial.
These patterns include Wally Trollman, Ogre Doug, Bob Goblin, Bing Bong, and Baymax (his hands are slightly different but use the same technique).


These patterns include Wally Trollman, Ogre Doug, Bob Goblin, Bing Bong, and Baymax (his hands are slightly different but use the same technique).

For this example I am using a seperate color for the fingers and hand. Most of my patterns you will continue using the same color for both.
I am using size 5mm crochet hook in this photo tutorial to make it easier to see. If you have trouble using your usual amigurumi crochet hook you can also go up a size or two crochet hook to make it easier for you. My usual amigurumi crochet hook is 3.25mm.
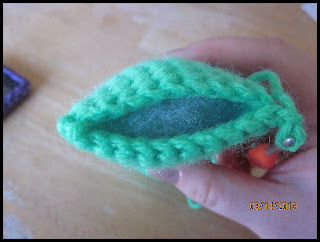
Fingers and hands are recommended to be sewn “inside out” or the “wrong way” of usual amigurumi.
Starting with the fingers, make 4 for each hand
Rnd 1 ~ Using a magic ring, place 3 sc into the magic ring
Rnd 2 ~ sc around (3 sc)
Rnd 3 ~ dec, sc (2 sc)
- Fasten off, leaving a tail for weaving in later.

You will now join all the fingers by crocheting them together.
Rnd 1 ~ Joining with a sc in the first finger
and working through both stitches of the last round of each finger, inc in the first finger,

inc in the second finger,

inc in the third finger (6 sc)

Rnd 2 ~ The pictures below show you how to crochet the second round.
Now you will work in a spiral, ch 1, turn , first crochet in the back loops of the 6 sc, then around to the front loops of the sc. (12 sc)
The loops on the top will be your first 6 sc.


Turn the hand and continue by crocheting on the bottom loops.

You will now have 12 sc total.
Rnd 3 ~ Now you will join the last finger (his thumb) by joining with a sc,

sc around the the rest of the hand (13 sc)

Follow the rest of the crochet pattern, depending on the character you are making the last few rounds will be different.
Now you will need to weave in the ends of each finger.
Use each tail to secure the finger in place as well.

Your hand is now complete! Repeat these steps to create a second hand.

Thank you! This is explained very clear and the pictures are very helpful...I can see what is going on! Good job!
ReplyDeleteThis comment has been removed by the author.
ReplyDeletevery nice and pretty quality embroidery digitizing services
ReplyDelete